Ever seen a gymnast holding themselves up with their arms stretched out like a human “T” on the rings? That’s the Iron Cross, and it’s as tough as it looks. It’s one of those moves that makes everyone go “Wow!” when they see it.
But here’s the thing – the Iron Cross isn’t just for Olympic superstars. With the right training, you can work your way up to it too. In this article, we’re going to break down five key exercises that’ll help you on your journey to mastering the Iron Cross.
Contents
Exercise 1: Chicken Dips
Chicken dips on parallel bars, also known as PE bars, are the first crucial step in your journey towards mastering the Iron Cross. The motion resembles the flapping motion of a chicken’s wings, hence the name “chicken dips.”
They involve gripping the bars with hands placed behind the body and leaning forward slightly, lowering the chest towards the bars while keeping the elbows close to the body.
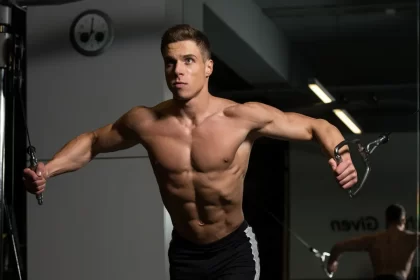
This exercise primarily targets the chest, shoulders, and triceps, all crucial muscle groups for the Iron Cross. Here’s exactly how to perform them:
Basic Setup and Execution
- Start with the parallel bars set fairly close together.
- Mount the bars, supporting your body with straight arms.
- Perform dips by lowering your body between the bars and then pressing back up.
- Complete 3 sets of 10 repetitions.
Progression Steps
As you get stronger, you can increase the difficulty of the exercise in the following ways:
- Widen the bars:
If the initial setup feels too easy, turn the rails outward to increase the distance between them. This wider grip will challenge your muscles more intensely.
- Add a weight jacket:
Once you’re comfortable with bodyweight dips on wide bars, introduce a weight jacket. This adds resistance, further building your strength. For an even greater challenge, progress to wearing two weight jackets. This significant increase in resistance will push your strength to new levels.
- Incorporate ankle weights:
As an additional progression, add ankle weights. This not only increases overall resistance but also engages your core more as you stabilize the extra lower body weight.
Training Tips
- Maintain the 3 sets of 10 repetitions structure throughout your progression. This provides a consistent volume to measure your improvements against.
- Focus on maintaining proper form throughout the movement, regardless of the difficulty level.
- Ensure a full range of motion: lower yourself as far as you can comfortably go, then press all the way back up to straight arms.
- Rest for 1-2 minutes between sets, or longer if needed when using additional weight.
Exercise 2: Support Holds and Small Presses
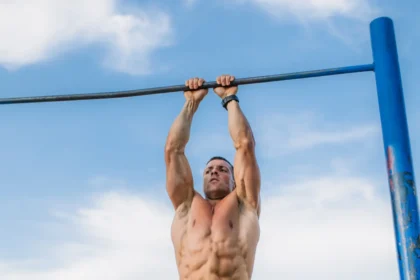
Support holds involve gripping the apparatus (such as still rings) with both hands while keeping the arms straight and the body suspended above the ground.
The goal is to maintain a static position with the arms fully extended, engaging the muscles of the shoulders, chest, and core to stabilize the body.
How to Perform Support Holds
Starting Position:
- Hang from the rings with straight arms.
- Use a box or platform if needed to reach the rings.
The Hold:
- Press yourself up until your arms are straight and your shoulders are down and back.
- Keep your body straight, core tight, and legs together.
- Hold this position with your arms next to your body.
Duration and Sets:
- Perform 2 sets of 30-second holds.
- Rest for 60-90 seconds between sets.
Progression:
- As you build strength, aim to increase the hold time while maintaining proper form.
- Advanced gymnasts may work up to holds lasting 45-60 seconds or more.
2. Small Presses
Small presses involve pushing slightly outward or to the sides without extending all the way into a full cross position. This approach helps athletes build the foundation and muscle memory required to eventually achieve the full Iron Cross.
Starting Position:
- Begin in the support hold position described above.
The Press:
- Slowly lower your body by bending your arms slightly, allowing your shoulders to come forward.
- Press back up to the starting position, focusing on using your chest and shoulder muscles.
- The movement should be small – you’re not doing full dips, just small presses to activate the muscles used in the Iron Cross.
Repetitions:
- Perform 3 sets of 6 repetitions.
- Rest for 60-90 seconds between sets.
Using Elastic Bands for Assistance
The band will provide support, making the exercise more manageable. Here’s how to use them effectively:
Support Holds with Elastic:
- Loop a resistance band around both rings.
- Place the band under your armpits or around your upper back.
- The band should provide upward support, making it easier to hold your body up.
- Adjust the band’s tension: use a stronger band for more assistance, or a lighter band as you progress.
Small Presses with Elastic:
- Keep the elastic band in the same position as for support holds.
- As you press outwards, the band will provide resistance against the movement.
- This allows you to perform the pressing motion with reduced body weight.
Always check the band for wear and tear before use. Ensure the band is securely attached to the rings. Never release the rings suddenly while using the band, as it may snap back.
Exercise 3: Full Cross Presses
This exercise allows you to go through the motions of moving from a support hold all the way to the Cross position.
The beauty of this exercise lies in its versatility – there are multiple variations suitable for different skill levels, ensuring that no matter where you are in your training, you can practice this important movement.
1. Extendable Rings Cross Press
This is probably the easiest variation and a great starting point for many.
Equipment needed:
- Rings with extendable straps, or rings that are “open” (not fixed in position)
- Armbands, pieces of foam, or some form of arm protection
How to perform:
- Adjust the rings to a suitable height.
- Put on your arm protection to prevent rubbing where your arm goes through the ring onto the strap.
- Perform the cross press movement, going from a support hold to a cross position and back.
2. Elastic-Assisted Cross Press
This variation allows you to adjust the difficulty based on the resistance of the elastic bands.
Equipment needed:
- Rings
- Elastic bands
How to perform:
- Attach elastic bands either to your feet or around your body.
- The resistance of the band determines the difficulty – looser bands make the exercise harder.
- Perform the cross press movement with the assistance of the elastics.
Note: The instructor mentioned using a pretty loose band, which made the exercise quite challenging.
3. Coach-Assisted Cross Press
This variation is great for receiving immediate feedback and support.
How to perform:
- Have your coach stand ready to support you.
- Perform the cross press movement while your coach provides necessary support and guidance.
4. Looped Rings Press
This is considered the most advanced variation and the most challenging to set up.
Equipment needed:
- Rings
- Loop bands
How to perform:
- Loop the bands around the straps of the rings.
- Put your arms through these loops.
- Perform the cross press movement.
Note: This variation brings the center of mass very close to your wrists, making it feel very similar to performing an actual Iron Cross. It’s quite advanced – even experienced gymnasts may find it challenging.
Mixing and Matching
The key takeaway is that there’s no one-size-fits-all approach to Full Cross Presses. You can:
- Combine different variations (e.g., using loop bands with elastic assistance).
- Try different methods to find what works best for you.
- Adjust the difficulty by changing band resistance or the level of assistance.
Exercise 4: Static Iron Cross Hold
A static Iron Cross hold is an advanced gymnastic exercise that involves suspending the body horizontally on the still rings in a fully extended cross position.
This exercise isolates the cross position, allowing you to build specific strength and stability without the dynamic element of the press.
How to Perform the Static Iron Cross Hold
Ring Setup:
- Adjust the rings to be at the same level as your shoulders when standing.
Entry:
- Jump directly into the cross position. This eliminates the press movement, focusing solely on the hold.
Assistance Methods:
You can perform this exercise using various assistance methods:
- With an elastic band
- With a coach supporting you
- By yourself (for more advanced gymnasts)
- Using loops (as described in the Full Cross Presses section)
The Hold:
- Once in the cross position, hold for as long as you can maintain proper form. The difficulty of this exercise largely depends on the resistance of the elastic band you’re using (if you’re using one).
Alternative: Cross “Jumps”
If holding the full cross position is too challenging, you can modify the exercise. Instead of holding the cross, perform quick “jumps” into the cross position. These short entries into the cross are an excellent way to:
- Fire up the muscles used in the Iron Cross.
- Get your body accustomed to the feeling of being in the cross position.
Exercise 5: Eccentric Bicep Curls
Eccentric Bicep Curls are a game-changer for anyone struggling with elbow pain during cross training, especially those with hyperextended elbows.
This exercise focuses on strengthening your bicep tendons, which play a crucial role in stabilizing your elbows during the Iron Cross.
How to Perform Eccentric Bicep Curls
Equipment:
- Dumbbells or a barbell
- Start with a lighter weight than you would use for regular bicep curls
Starting Position:
- Stand with feet shoulder-width apart
- Hold the weights with palms facing forward
- Keep your elbows close to your sides
The Curl:
- Curl the weights up to your shoulders quickly (concentric phase)
- Slowly lower the weights back down, taking 3-5 seconds (eccentric phase)
- Focus on controlling the descent and resisting the pull of gravity
Repetitions and Sets:
- Begin with 3 sets of 8-10 repetitions
- Adjust based on your strength level and comfort
So, are you ready to give it a shot? Start working these exercises into your routine. Just remember: hold the vision, trust the process, and keep at it. You’ve got this!