At first glance, the straddle press handstand may look effortless, gracefully lifting the legs into a handstand with no momentum, just control. But ask any gymnast, yogi, or calisthenics athlete, and they’ll tell you: it’s one of the hardest skills to master.
- What Is a Straddle Press Handstand?
- Why the Straddle Press Feels (and Is) Tougher
- So Why Do People Try the Straddle Press Handstand?
- Straddle Press to Handstand: A Step-by-Step Guide
- Step 1: Learn the Wall Press Setup
- Step 2: Practice the Freestanding Floor Prep
- Step 3: Work on the Straddle Hover
- 10 Common Straddle Press Handstand Mistakes
So, is the straddle press harder than a normal handstand?
What Is a Straddle Press Handstand?
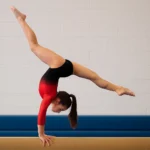
The straddle press handstand is a skill where you lift into a handstand from a wide-legged standing or sitting position (often a straddle), without jumping or using any momentum. It’s slow, controlled, and powered entirely by your body’s strength and flexibility.
Unlike the typical kick-up handstand, which uses leg swing and momentum to get upside down, the straddle press is about pure control and strength from the ground up.
Why the Straddle Press Feels (and Is) Tougher
A kick-up handstand uses momentum to cheat gravity—you swing your legs, shift your weight, and ride the arc to balance. The straddle press, on the other hand, offers no such shortcut. Every inch of lift must come from raw strength and precise control.
Lab studies on elite male gymnasts have shown that during the second half of a straddle press, the shoulders must generate shoulder flexion moments approaching three times body weight—a force far greater than what’s required in a static handstand or even a kick-up entry.
On top of that, the gymnast must fold the torso tightly between the legs—a movement known as pancake compression—while simultaneously allowing the hips to shift forward, clearing the feet from the ground. This dual action taxes:
- Active flexibility in the hamstrings and hip flexors
- Scapular and shoulder strength
- Core compression and balance
It’s not just a strength move—it’s a full-body coordination challenge. And that’s exactly what makes it so much harder than it looks.
Skill Comparison: Kick-Up vs. Straddle Press
| Feature | Kick-Up Handstand | Straddle Press Handstand |
|---|---|---|
| Entry Method | Uses momentum from leg swing | Slow strength-based lift |
| Control Needed | Moderate | Very high |
| Strength Requirement | Low to moderate | High |
| Flexibility Requirement | Basic | Advanced (especially hamstrings and hips) |
| Balance Demand | Begins once inverted | Required from the ground up |
| Skill Level | Beginner to Intermediate | Advanced to Elite |
So Why Do People Try the Straddle Press Handstand?
The straddle press handstand isn’t just a show-off move—it’s considered foundational in gymnastics. Coaching guides often list the straddle-sit press as an “extremely important early developmental skill” because it lays the groundwork for bigger elements like casts, stalder circles, and even planche progressions.
It also builds serious shoulder and core strength without beating up your joints. Unlike tumbling or explosive drills, the press loads your body slowly and evenly, making it a smart, low-impact way to train for long-term progress.
And let’s not forget the artistry. In artistic gymnastics, a clean, controlled press is officially recognized as a strength skill. The FIG Code of Points rewards a smooth, hesitation-free rise with bonus difficulty value—so it’s both functional and beautiful.
Straddle Press to Handstand: A Step-by-Step Guide
In this guide, Ryan from GMB Fitness breaks down how to train for the straddle press to handstand using a series of smart progressions.
Step 1: Learn the Wall Press Setup
The first step is getting comfortable with the movement mechanics—and for that, the wall is your best friend.
Wall Setup Tips:
- Don’t place your hands too close or too far from the wall. Find a middle ground that feels secure.
- Start with your head and shoulders touching the wall. This gives you a physical reference point as you roll your back upward.
- Turn your elbow pits forward to lock out your arms and engage your shoulders properly.
This is where you’ll practice slowly rolling your back up the wall, lifting your legs into the straddle position. In the beginning, jumping is okay. The key is to use the wall to understand the feeling of the movement, especially how it should feel when descending back down.
Wall Drill Goal:
Control the descent. Even if you jump up at first, focus on slowly lowering your legs back down with control. This helps you build the strength and awareness needed for the full press later.
Step 2: Practice the Freestanding Floor Prep
Once you’re comfortable with the wall drill, it’s time to take it to the floor and begin training without support.
Start with Floor Positioning:
- Your hands should not be directly under your feet, nor should they be too far out.
- Find a middle point that allows you to comfortably lean forward and distribute weight evenly.
The Freestanding Prep Drill:
- Start in a deep straddle fold with hands on the floor.
- Round your back and shift your weight forward slightly.
- Rise up onto your toes and begin compressing your hips toward your chest.
- Don’t press into the handstand just yet. Instead, hold this prep position and then slowly lower your feet back to the floor.
The focus here is body position, not the full handstand. You’re training your body to recognize the right alignment and compression needed for a successful press.
Step 3: Work on the Straddle Hover
Once the floor prep feels solid, challenge yourself with a hover.
The Straddle Hover Drill:
- Enter the same straddle compression position from the prep drill.
- This time, actively try to hover your feet just slightly off the floor.
- Lock your arms, engage your core, and drive the hips upward.
- Hold the hover for a second or two before lowering back down with control.
No Jumping Allowed.
This is a strength and technique drill. You’re building the ability to lift your legs from the ground through compression, not momentum. Resist the urge to hop.
Once this hover becomes easier, you can try extending the straddle into a full press to handstand, or play with bringing your feet together once you’ve lifted partway up.
10 Common Straddle Press Handstand Mistakes
Here are 10 of the most common mistakes, how to identify them, and what to do instead:
1 | Insufficient Active Hip Compression
The Mistake: The hips stay behind the hands, keeping the feet glued to the floor.
Spot It: The gymnast leans forward, but the heels never lift.
Fix It: Do daily straddle leg lifts and pancake hinge reps. Aim to lift both heels off the ground for 10 clean reps—without leaning back.
2 | Not Leaning the Shoulders Forward Enough
The Mistake: Shoulders stack directly over wrists, leaving the center of gravity too far back.
Spot It: The press never lifts, even when everything looks “tight.”
Fix It: Practice wall-facing handstand leans, nose just off the wall. Learn to push tall and then lean forward.
3 | Opening the Hips Too Soon
The Mistake: The legs lift before the shoulders finish protracting, stalling the press.
Spot It: Hips start to rise, but the legs swing or drop midway.
Fix It: Train slow negatives—lower from handstand to toe-tap in 5 seconds. This grooves the correct lift sequence.
4 | Bent or Buckling Elbows
The Mistake: Unlocked elbows shorten the lever and make the triceps work overtime.
Spot It: Arms shake or collapse during the press.
Fix It: Do straight-arm planche leans and scapular shrugs to build lockout strength and shoulder elevation.
5 | Using a Mini-Jump (Momentum Crutch)
The Mistake: A subtle hop helps lift the feet, but eliminates true strength development.
Spot It: Feet leave the floor before the shoulders pass the fingertips.
Fix It: Film from the side. Any toe-lift before your shoulder lean is visible? Restart the rep.
6 | Sagging Lumbar or Anterior Pelvic Tilt
The Mistake: The lower back overarches, breaking the line and stressing the lumbar spine.
Spot It: Visible arch or “banana” shape forms mid-press.
Fix It: Drill posterior pelvic tilt tuck-ups—focus on drawing ribs down and hips under as the legs lift.
7 | Wrist Pain from Poor Mobility or Angle
The Mistake: Limited wrist extension forces shoulder drop and wrist strain.
Spot It: Discomfort or sharp pain during the lean.
Fix It: Build up to 70–90° passive wrist extension holds. Try turning hands 30–45° outward for a wider base.
8 | Uneven Weight Shift (Left/Right Bias)
The Mistake: One hand carries more load, twisting the press and causing imbalances.
Spot It: Body leans or rotates toward one side during lift.
Fix It: Mark a centerline and pause halfway. Check for even fingertip pressure under each hand.
9 | Holding the Breath
The Mistake: Breath-holding increases tension and reduces fingertip control.
Spot It: Rigid posture and sudden collapse midway up.
Fix It: Exhale during the lean, then take shallow breaths as you lift. Keep the core tight without over-bracing.
10 | Skipping Eccentric Control on the Way Down
The Mistake: Only training the lift-up leaves a gap in strength and control.
Spot It: You can lift up, but collapse quickly when lowering.
Fix It: End each session with 3 slow controlled lowers, gently tapping toes before bending knees.
Quick Self-Assessment Checklist
- Shoulders over fingertips before feet lift? Yes/No
- Elbows locked and rotated forward? Yes/No
- Hip crease below navel at liftoff? Yes/No
- Wrists pain-free in 90 ° extension? Yes/No
- Five-second negative controlled? Yes/No
If any answer is “No,” revisit the corresponding fix above before adding more volume.
Bottom Line: The straddle press handstand is tough, but worth it. You’ll build stronger shoulders, more flexible hips, better handstand control, and real full-body awareness. And once you get it, you’ll carry that strength and skill into everything else you do—gymnastics, yoga, calisthenics, or just moving better in daily life.