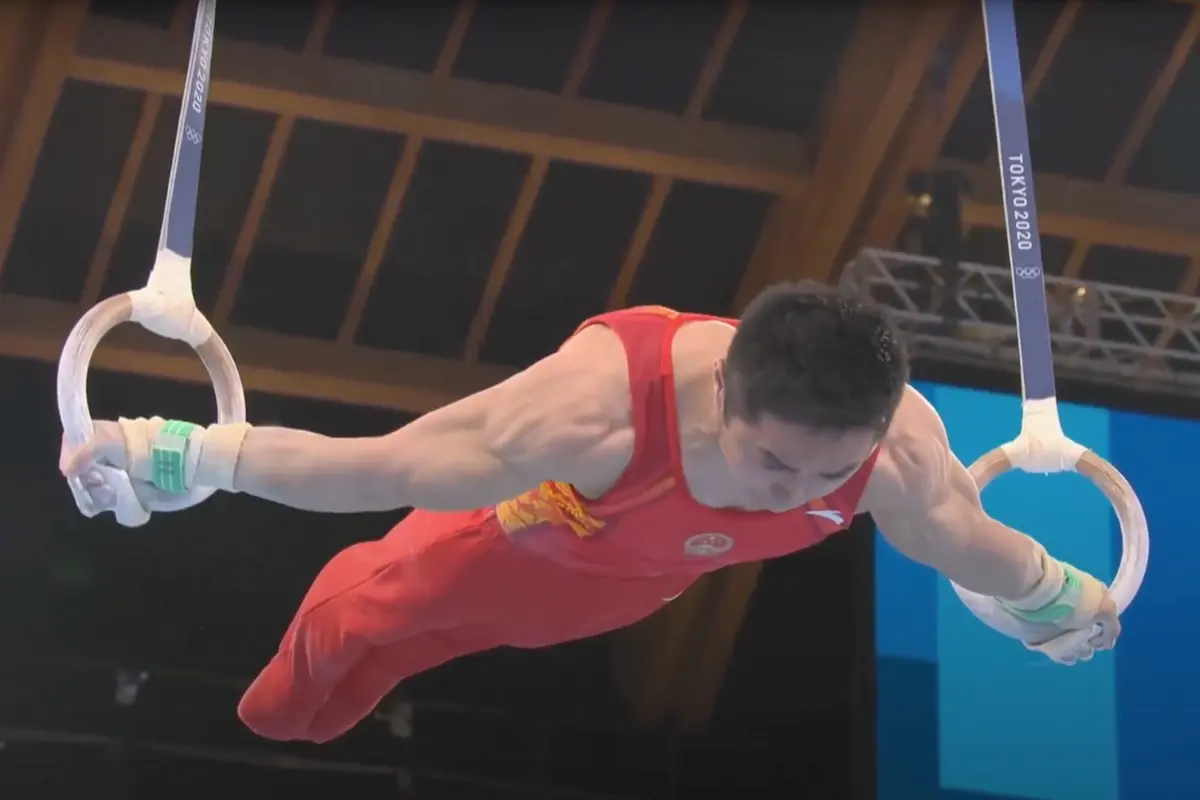
Few bodyweight moves command as much respect — or fear — in the calisthenics community as the Maltese. Often described as one of the hardest static holds in bodyweight training, the Maltese isn’t simply a wider‑grip planche; it’s a unique strength feat in which your entire body remains level with the support surface, whether that’s rings, parallettes, or dip bars.
What Is the Maltese?
The Maltese, sometimes called the “Maltese Cross,” is a straight-arm strength hold commonly performed on gymnastics rings (though advanced practitioners can also attempt it on parallettes or floor).
In the correct Maltese position, your torso is held completely horizontal, parallel to the ground, while your arms extend out to your sides at shoulder level. Because there is no bend at the elbows, your shoulders, core, and entire upper body must work extremely hard to maintain the position.
Within the structured world of gymnastics, the Maltese is recognized as one of the most challenging static holds, earning a high degree of difficulty in the Code of Points.
The Connection: Back Lever, Planche, and Maltese
One of the most useful concepts for aspiring ring athletes is recognizing how the back lever, planche, and Maltese reinforce each other. Though these skills place your body at different angles, they rely on the same critical elements:
- A rounded, hollow body position
- Shoulders protracted/depressed (pulled forward and slightly down)
- Straight-arm strength and intense scapular stability
- Full-body tension, from shoulders to toes
Working on any of these skills will help you develop strength and control that transfers directly to the others. This synergy makes your training more efficient. You learn a “language” of straight-arm, hollow-body control that applies to all three moves. So if you’re drilling back levers or planche leans, you’re also building a base for the Maltese—and vice versa.
Recommended Prerequisites
The Maltese is highly demanding on your connective tissues (tendons, joints), so a robust baseline strength is essential. You’ll generally find it much easier if you already have:
- A solid 10+ second back lever hold
- Proficiency in holding a straddle planche on the ground
- Adequate elbow and shoulder joint strength (a decent iron cross hold is beneficial)
- Substantial bent-arm pushing strength (weighted push-ups, dips, bench press – aim for 1.5x bodyweight)
While an iron cross is not mandatory, it provides an excellent foundation for the elbow and shoulder strength required in the Maltese.
Step-by-Step Guide: Performing a Maltese on Rings
Mastering the Maltese on rings can take months or even years of dedicated practice, so be patient and persistent in your training. Here’s a step-by-step guide to performing a Maltese on rings:
1. Grip and Positioning
Once you’re warmed up, it’s time to focus on your grip and hand positioning for the Maltese. Start by gripping the rings with an overhand grip, meaning your palms should face away from you. Hold the rings firmly, but not too tight, as over-gripping can tire your forearms quickly.
Next, position your hands just slightly wider than shoulder-width apart. This wider grip will give you more stability and help you control the movement better. It also puts your arms in a better position to achieve the deep stretch needed for the Maltese.
Getting your grip and hand placement right early on will make it easier to progress and maintain good form as you work on the Maltese.
2. Lowering into the Maltese
The next phase is about control and precision. Start from a high support position with your arms straight and your body extended. Engage your core, glutes, and legs to ensure a tight, hollow body position. This body tension is key to maintaining stability throughout the movement.
Begin to slowly lean forward while keeping your arms locked out. As you lean, your shoulders should move directly over your hands, beginning the transition into the Maltese position. You should feel a gradual shift in your body weight as you move deeper into the hold. Avoid rushing this process—smooth, controlled movements are critical for building strength and preventing injury.
3. Achieving the Maltese Position
Now, we enter the heart of the Maltese. As you continue to lean forward, your body should slowly lower until your shoulders are below the level of the rings. Keep your arms extended and locked out as you descend.
At this point, your body should be close to parallel with the floor, with your chest facing downward. To maintain balance, your hips should be slightly higher than your shoulders. This subtle angle helps to keep the body aligned and stable.
It’s easy to get caught up in the desire to hold this position for long periods, but initially, focus on achieving perfect form for even a short hold. Proper body alignment and tension are far more important than duration at this stage.
4. Maintaining the Hold
Once you’re in the Maltese position, the goal is to hold it as steadily as possible. This is where full-body engagement becomes crucial. Activate your core muscles, legs, and glutes to stabilize your body and prevent any sagging in the hips or lower back. Think of the Maltese as a full-body tension exercise, and your goal is to keep every muscle tight and engaged.
Breathing is another important element. Many athletes make the mistake of holding their breath, which can lead to fatigue. Instead, focus on slow and controlled breathing, which will help you stay relaxed and keep your muscles from tensing up unnecessarily.
Also, keep your eyes focused on a point in front of you. This will help with balance and concentration, allowing you to stay centered during the hold.
5. Exiting the Maltese
When it’s time to come out of the Maltese, the key is to maintain control throughout the process. Reverse the movement slowly, lifting your body back up and returning to the high support position. Keep your arms straight and your core engaged as you transition. It’s important to be cautious as you exit the hold to avoid straining your shoulders or wrists.
Take a moment to rest in the high support position before gently lowering yourself down from the rings. Never rush the exit; coming down too quickly could place unnecessary strain on your joints.
Assisted Progressions for Maltese Mastery
If you’re just starting to train for the Maltese, assisted progressions are a great way to build strength and get your body used to the movements. Here are a few key exercises to help you along the way:
1. Maltese Lowering on Low Rings or Parallettes
This exercise helps you practice the lowering phase of the Maltese while giving you a bit of assistance as you build strength.
How to Do It:
- Start in a support position on the rings (arms straight, body lifted).
- Slowly lower your body toward the Maltese position.
- At first, your feet may lightly touch the ground or a box to give you extra support.
- The focus is on keeping your arms straight and maintaining control as you lower your body.
Why it works:
- Eccentric Training: The focus on controlled lowering strengthens the muscles and tendons that will be used when you eventually hold the Maltese. The slower you lower, the more tension you place on the muscles, helping them adapt and grow stronger.
Pro Tip: The longer you can maintain control while lowering, the more effective this exercise will be in building the strength needed for the Maltese.
2. Assisted Maltese Hold
Using resistance bands or a spotter, you can practice holding the Maltese position with less bodyweight, allowing you to work on form and muscle engagement.
Set-Up with Bands:
- Attach a resistance band to the rings, with the band under your feet or knees.
- Step into the band and pull yourself into the Maltese position with the assistance of the band.
- Hold this position for a short duration, focusing on maintaining proper form: straight arms, engaged shoulders, and a strong core.
Spotter Assistance:
- A spotter can manually support your body while you hold the Maltese position. This allows you to focus on the correct muscle engagement without worrying about balancing your full body weight.
Why it works:
Strength Development: Resistance bands and a spotter help you work the specific muscles used in the Maltese while experiencing the position. Over time, the amount of assistance can be reduced as your strength improves, allowing you to hold the position for longer durations.
3. Maltese Rocks
This dynamic movement helps develop control, strength, and body awareness while transitioning in and out of the Maltese position.
Starting Position:
- Begin in an inverted hang on the rings, with your legs either in a tuck or straddle position.
The Rocking Motion:
- Gently rock your body forward, trying to hold a brief tucked or straddled Maltese position.
- You don’t need to hold it long—just focus on getting into the position and briefly maintaining control before returning to the starting hang.
This exercise develops dynamic control and strengthens the muscles needed for the Maltese, while also improving your body awareness in the Maltese position.
Conclusion
To master the Maltese cross, focus on strength training, using progressions, and allowing your body time to recover. Stay consistent, keep track of your progress, and gradually increase the difficulty as you get stronger. With patience and hard work, you’ll get there!
