Learning to handstand can feel like walking a tightrope—wobbly, intimidating, and a little scary. But there’s one tool that instantly makes the process safer, simpler, and more effective: the wall.
Why the Wall Works
The wall is one of the best tools for safely and confidently learning handstands. Here’s why it helps so much, especially when you’re just getting started:
It Keeps You Safe
When your feet press against the wall, you can’t accidentally fall backward into a bridge or roll over. That one safety feature helps prevent common neck and lower back injuries—problems that often happen when beginners over-rotate and can’t control the fall.
It Reduces Fear
The wall gives you an extra point of contact, so you don’t feel like you’re free-floating in space. That small boost of confidence makes a big difference—it helps you kick up or walk up with better form. You’re more likely to keep your elbows straight, shoulders shrugged, and core tight instead of panicking and flailing.
It Lets You Build Strength Slowly
You don’t need to go fully upside-down right away. You can start with a diagonal plank at a 45° angle, then slowly walk your feet higher over time. You’re always in control, and you can step down anytime. This gradual approach helps your wrists, shoulders, and core get stronger without putting too much pressure on your joints.
Prerequisite Mobility & Strength
Before you try a full handstand, make sure your body has the basic mobility and strength to handle it safely. Here are three things to check first:
Wrist Mobility
You should be able to bend your wrists to 90 degrees (hands flat on the floor) without any pain. This is key for supporting your bodyweight.
Shoulder Flexibility
When you raise your arms overhead, your biceps should touch your ears while keeping your ribs pulled down. This means your shoulders are open enough for a proper handstand line.
Core & Shoulder Strength
You should be able to:
- Hold a 20-second hollow body position (lying on your back, arms and legs lifted, core tight)
- Hold a 20-second plank with your shoulder blades actively pushing away from the floor (scapular protraction)
These two holds show that your core and shoulder muscles are strong enough to support you upside-down—without dumping pressure into your elbows or lower back.
Wall Handstand: A Step-by-Step Guide for Beginners
Learning to handstand isn’t about one big leap—it’s a smart series of small steps. Each stage builds strength, control, and confidence, without adding much risk. Here’s how to progress safely using the wall:
Step 1: Diagonal Wall Plank
Start facing the wall. Place your hands about one stride away and walk your feet up three steps, forming a diagonal shape. Push firmly into the floor until your upper back rounds slightly.
Let your wrists feel some bodyweight, then walk back down.
✅ Do this in short sets until your forearms stop burning—this means you’re getting stronger.
Step 2: Walk Higher
Once the diagonal feels easy, walk your feet higher until your hips rise about 60° above your wrists. Press your toes into the wall, squeeze your glutes, and focus on breathing into your lower ribs.
🏁 Goal: Hold for 20 seconds with steady breathing and no shaking. Once you can, move to the next step.
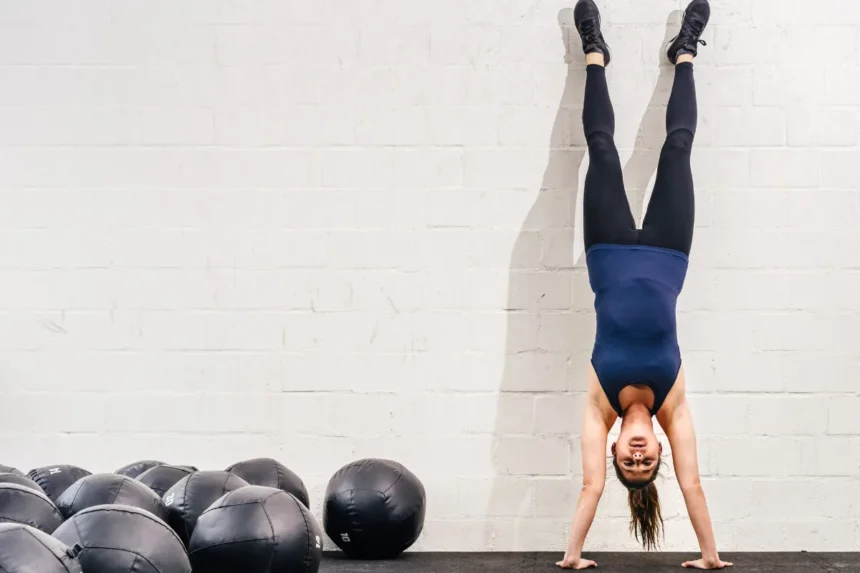
Step 3: Full Chest-to-Wall Handstand
Climb until your shoulders are stacked directly over your wrists. Your body should now be in a straight line. From here, try wall shrugs—slide your toes up and down the wall just a few inches while keeping elbows locked.
This teaches you how to elevate your shoulders and stay tight through your core.
Step 4: Back-to-Wall Kick-Ups
Now turn around. Practice kicking up gently so your heels just tap the wall. Then try to hover just a centimeter away from the wall for 3-second bursts.
If you lose balance, let your heels touch the wall again—it’s your built-in safety net.
Step 5: Toe Pulls
From a back-to-wall hold, actively drag your toes down the wall until just your big-toe nails are in contact. If your body stays tight and straight, congratulations—you’re basically holding a freestanding handstand.
Let go for one inch more, and you’re floating.
Each step feels just as safe as the last—but the control, strength, and technique steadily increase. Progress at your own pace, and the wall will always be there to catch you.
(Inspired by: courses.coachbachmann.com)
Safe Exit Strategies
Even when you’re using a wall, it’s important to know how to get out of a handstand safely. A controlled exit helps you avoid injury and stay confident during practice.
Start by learning the cartwheel-out. This is your go-to for bailing when you start to tip sideways. Practice it low and slow: turn your hips to the side, place one foot down gently, and let the second leg follow through. It should feel smooth and natural—not rushed.
Next, practice the step-down. From a wall handstand, bend one knee and place that foot on the ground, then slowly lower the other leg. This is the easiest and safest way to come down from a wall hold—and it keeps everything under control.
(Inspired by: reddit.com)
Moving Away from the Wall
You’ll know you’re ready to practice in open space when you can hold a chest-to-wall handstand for 45 to 60 seconds while breathing calmly. If you can also lift each foot off the wall for five seconds without losing your shape, that’s a clear sign your body knows the right position.
At that point, kicking up in the middle of the room isn’t about guessing anymore. It’s just about repeating a shape your body already understands—with or without the wall.
Even then, keep the wall nearby. Experienced handstand practitioners still use it all the time—for warming up, building shoulder strength, or practicing longer holds without worrying about balance. The wall takes pressure off, so you can focus on clean reps—even on days when your energy or focus isn’t perfect.