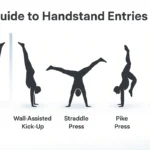
Wall-assisted handstands come in two main flavors: back-to-wall (BTW) and chest-to-wall (CTW).
Both help beginners turn gravity on its head—literally—without the fear of crashing down. But while they serve the same purpose of building confidence upside-down, they develop different habits, skills, and body awareness.
Back-to-Wall vs. Chest-to-Wall: Quick Comparison
| Drill | How You Get Up | What Touches the Wall | Main Focus |
|---|---|---|---|
| Back-to-Wall | Kick-up facing away from wall | Heels | Kick-up control and endurance |
| Chest-to-Wall | Walk or cartwheel up facing wall | Toes | Alignment, awareness, and form |
You don’t have to choose one and stick with it forever. In fact, most coaches recommend training both.
Back-to-Wall Handstand
Also called a “wall-supported kick-up”
Back-to-wall handstands are the most commonly used starting point. You begin by facing away from the wall, place your hands firmly on the floor, and kick up until your heels touch the wall behind you.
Why It’s Helpful for Beginners:
- Easiest entry method — mirrors how you’ll eventually kick up on open floor.
- Builds confidence — knowing the wall is behind you reduces the fear of falling.
- No wall walking needed — just kick up, catch your balance, and hold.
- Great for strength endurance — helps condition the shoulders, wrists, and core.
Common Mistakes:
- Banana back — many beginners relax into an arched spine, which teaches poor posture.
- Over-reliance on the wall — leaning back takes the effort out of stabilizing the body.
- Head misalignment — looking between the hands instead of keeping a neutral neck.
How to Do It Correctly:
- Start in a Pike: Stand about 2 feet from the wall, hinge at the hips, and place your hands on the floor 6–8 inches from the wall.
- Shoulder Elevation: Push the floor away so your shoulder blades rise. This activation keeps you stable.
- Kick-Up Gently: Swing the rear leg and use the grounded leg to hop until both feet land on the wall.
- Engage Your Body: Squeeze your glutes, legs, and core. Don’t just hang—stay active.
- Exit Safely: Lower one leg at a time and step down.
Chest-to-Wall Handstand
Also called a “wall-facing handstand”
In a chest-to-wall handstand, you face the wall, place your hands on the floor, and walk your feet up the wall until your toes touch the surface, keeping your body as straight as possible.
Why It’s Powerful:
- Enforces a straight line — it’s nearly impossible to arch without bumping the wall.
- Engages the full body — core, glutes, and shoulders must stay active.
- Builds pushing strength — trains the shoulder elevation and hollow-body position needed in freestanding handstands.
- Early proprioception — you’ll begin to feel balance and shift weight subtly without fear of falling backward.
Common Mistakes:
- Sagging stomach — causes lumbar strain and breaks alignment.
- Wrists overloaded — being too close too soon increases pressure.
- Over-correction — if you walk in too far, your back may reverse-arch (hollow-back).
How to Do It Correctly:
- Start in a Plank: Hands on the floor, feet at the base of the wall.
- Walk Up Slowly: Step your feet up the wall while walking your hands inward.
- Hold With Full Engagement: Shoulders elevated, core tight, glutes squeezed, and legs straight.
- Maintain Hollow Body: Avoid pressing your stomach or ribs into the wall.
- Exit With Control: Walk your hands out and feet down slowly—or cartwheel out if trained to do so.
Which Drill Should You Start With?
| Your Goal | Start With | Why It Helps |
|---|---|---|
| Get comfortable upside-down | Back-to-Wall | Easy to kick up and step down—less scary for beginners |
| Learn how to kick up properly | Back-to-Wall | Uses the same motion as a real freestanding handstand |
| Fix your handstand posture | Chest-to-Wall | Makes you keep your body straight and tight |
| Build shoulder and upper body strength | Chest-to-Wall | Strengthens the muscles that hold you up in a good position |
| Train for press-ups or handstand push-ups | Chest-to-Wall | Matches the strong, straight shape needed for pressing movements |
The best choice for beginners often depends on your primary goal and current physical condition:
- If your main aim is learning to kick up confidently: Start with back-to-wall handstands to build comfort and coordination.
- If proper alignment and strength-building are your priorities: Opt for chest-to-wall to encourage immediate good habits.
Most recreational coaches (and a growing number of CrossFit programmers) now blend both from week two onward because the skills are complementary, not competing.
Ideal Progression: Combining Both Methods
For the most balanced development, incorporating both approaches is ideal. Here’s a proven approach:
Phase 1 – CTW Foundation
- Start with wall-walks to a diagonal handstand.
- Push tall and hold for 20 seconds, repeat 5 times.
- Gradually inch hands closer to the wall.
- Work toward 45–60 second holds with a stacked, straight-line shape.
Phase 2 – BTW Balance
- Practice controlled kick-ups, aiming to touch the wall lightly for 2–3 seconds, then step down.
[Inspired by: bergmovement.com] - Add “slide-away” drills:
Lean slightly off the wall until your toes float, then hover and balance for a split second before returning.
Alternate these phases each session—or even within the same workout. This mixed stimulus keeps both alignment and balance improving side by side.
[Inspired by: courses.coachbachmann.com]
Final Thoughts: Use the Wall, Don’t Depend on It
There’s no winner in the BTW vs. CTW debate—just different tools for different jobs.
- BTW teaches entry, comfort, and bail-outs.
- CTW teaches alignment, strength, and balance awareness.
- Together, they give you the full package.
Practice both with intention, and progress will come faster than trying to jump straight to the middle of the room. The wall isn’t a shortcut—it’s your silent coach. Use it wisely, and soon, you won’t need it at all.