A front walkover often looks like a big, advanced gymnastics skill, but it’s really a controlled handstand that smoothly opens into a bridge and rises back to standing. Once you understand how those positions connect, the skill becomes far less intimidating and much more manageable.
- Before You Start: What You Should Already Know
- Step 1: Start in a Strong Lunge
- Step 2: Move Through the T-Lever
- Step 3: Kick Up to Handstand
- Step 4: Keep the Split as You Fall to Bridge
- Step 5: Push Through Your Hands and Stand Up
- Common Mistakes and How to Fix Them
- Progressive Drills That Close the Gap
- Bringing It All Together
Before You Start: What You Should Already Know
Before working on a front walkover, you should feel comfortable with:
- A strong, balanced lunge
- A controlled T-lever
- A stable handstand
- A safe, supported bridge
If your handstand still feels shaky or rushed, it’s worth spending more time there first. A clean front walkover depends heavily on how confident and controlled you are upside down.
Step 1: Start in a Strong Lunge
Every good front walkover begins with a clean, confident lunge. This starting position sets your balance, direction, and momentum for the entire skill.
Stand facing forward with one foot in front and one foot behind. Your front knee is bent, your back leg is straight, and both feet stay firmly planted on the floor. Most of your weight should be over the front leg while your torso stays tall and steady.
Lift your arms straight up by your ears, squeezing them tightly so they don’t drift forward or outward. Your shoulders should feel open, but your ribs stay pulled in, avoid arching your lower back at this stage.
Keep your head neutral and your eyes looking straight ahead. This helps you feel calm and balanced before moving forward.
What coaches look for:
- Arms fully extended and glued to the ears
- Chest lifted without arching
- Hips square and facing forward
- Calm, balanced posture
Simple cue to remember:
“Tall body, tight arms, steady balance.”
When your lunge feels solid and controlled, the rest of the front walkover becomes much easier to connect smoothly.
Step 2: Move Through the T-Lever
From your strong lunge, the next goal is to tilt forward into a controlled T-lever. This is where balance and patience really matter.
Begin by leaning your chest forward while lifting your back leg straight behind you. Your arms stay locked by your ears, your front leg stays strong, and your body stretches into a long line. When done correctly, your shape resembles the letter “T”, arms and torso reaching forward, back leg reaching behind.
This is not a rushed step. The T-lever helps you control the entry into the handstand instead of kicking wildly.
What correct form looks like:
- Arms tight by the ears
- Back leg straight and lifted
- Hips square and facing the floor
- Chest and back leg rising together
- Front leg stable and grounded
Coaching cue:
“Reach forward first, then go down.”
Even a brief, controlled T-lever can make the handstand entry, and the entire walkover, feel smoother and safer.
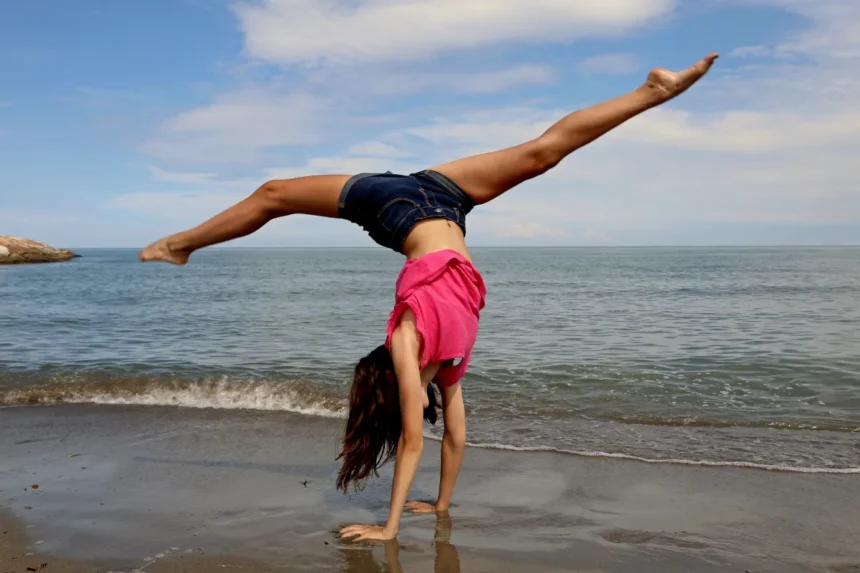
Step 3: Kick Up to Handstand
From your T-lever, gently place your hands on the floor and kick up into a controlled handstand. This should feel like your normal handstand, calm, balanced, and intentional.
As your hands touch the floor, keep your arms straight and squeezed by your ears. Push tall through your shoulders as your legs kick up into a front-to-back split. One leg leads and the other follows, creating length and control rather than speed.
The goal here is to hit the handstand first. Even a brief moment of balance upside down helps set up the rest of the skill.
What coaches look for:
- Straight arms and strong shoulder push
- Head neutral, eyes between the hands
- Legs split, not together
- Tight core with no banana arch
- A moment of control before continuing
Coaching cue:
“Kick to handstand, then move on.”
A consistent split handstand makes the transition into the bridge smooth and predictable.
Step 4: Keep the Split as You Fall to Bridge
This is the moment where a handstand becomes a front walkover, and where many beginners hesitate.
From your split handstand, do not bring your legs together. Keep the split and allow your leading leg to slowly reach back toward the floor. Think of this as a controlled descent, not a drop.
As the first foot lowers, your back naturally opens into a bridge. Your arms stay straight, your shoulders stay pushed tall, and your body continues moving in one smooth line.
What correct form looks like:
- Split maintained until the first foot touches
- Arms straight and tight by the ears
- Open shoulders supporting the weight
- Gradual back arch, not sudden
- Smooth, continuous motion
Coaching cue:
“Reach the foot back, don’t drop.”
Staying patient here is what makes the front walkover look fluid instead of forced.
Step 5: Push Through Your Hands and Stand Up
Once your first foot has landed and you’re in a stable bridge, the final step is to push through your hands and stand up with control.
Shift your weight slightly forward into your hands and press firmly through your palms. Your chest lifts first, followed by your head and arms. Keep your eyes focused on your hands as they rise toward the ceiling.
As your chest comes up, your second foot steps down to meet the first. Finish standing tall with your arms still tight by your ears, just like you started.
This should feel like standing out of the bridge, not jumping out of it.
What coaches look for:
- Strong push through straight arms
- Chest lifting before the head
- Eyes following the hands upward
- Controlled step-down of the second foot
- Balanced, confident finish
Coaching cue:
“Push, lift the chest, follow your hands.”
When done correctly, the front walkover finishes with control and confidence, smooth, strong, and effortless rather than rushed.
Common Mistakes and How to Fix Them
| Mistake | Why It Happens | How to Fix It |
|---|---|---|
| Head drops too early | Gymnast wants to “spot the floor.” | Drill fingertip-led bridges on a wall to reinforce eye–hand connection. |
| Bent knees mid-air | Hamstring tightness or fear of opening the split. | Use dynamic hamstring kicks and needle-kick split drills on panel mats. |
| Bridge collapses / bent arms | Weak shoulder push or limited core support. | Practice bridge rocks and handstand shoulder taps; cue “push tall through armpits.” |
| Second foot slams down | Timing issues or hips not fully open. | Place a low octagon or mat under the bridge to slow the descent. |
| Twisting off-line | Uneven leg drive or hand placement. | Use a tape line on the mat; hands straddle it, feet land centered. |
Progressive Drills That Close the Gap
These drills bridge the gap between basic flexibility and a confident front walkover. Work through them in order to build control, timing, and confidence.
1. Handstand to Bridge on a Wedge
What it trains: Smooth entry and safe shoulder opening.
How to do it: Kick to a handstand at the top of a wedge mat, then slowly arch into a bridge down the slope.
Why it works: The incline slows the movement and gives the gymnast time to feel the transition.
2. Split-Handstand Holds (3 Seconds)
What it trains: Control and split awareness.
How to do it: Hold a front-back split in handstand for three seconds before coming down.
Why it works: Reinforces balance and timing in the middle of the walkover.
3. Bridge Kick-Over with Raised Feet
What it trains: Confidence and strength during the kick-over phase.
How to do it: Start with feet on a 30 cm block, then gradually lower the height.
Why it works: Elevation reduces strain and builds confidence before moving to the floor.
4. Tick-Tocks on a Line or Low Beam
What it trains: Shoulder push, balance, and rhythm.
How to do it: Rock from handstand to bridge and back again with control.
Why it works: Teaches the gymnast they’re never “stuck” upside down.
Bringing It All Together
Aim for two focused training sessions per week and allow six to eight weeks for noticeable progress. With patience and consistency, the front walkover will come, and it will feel just as good as it looks.