The Skin the Cat is a fundamental calisthenics exercise that targets multiple muscle groups and helps build strength and flexibility. In this guide, we’ll walk you through how to perform the Skin the Cat correctly, step by step, and share tips to make it easier as you progress.
What Is Skin the Cat?
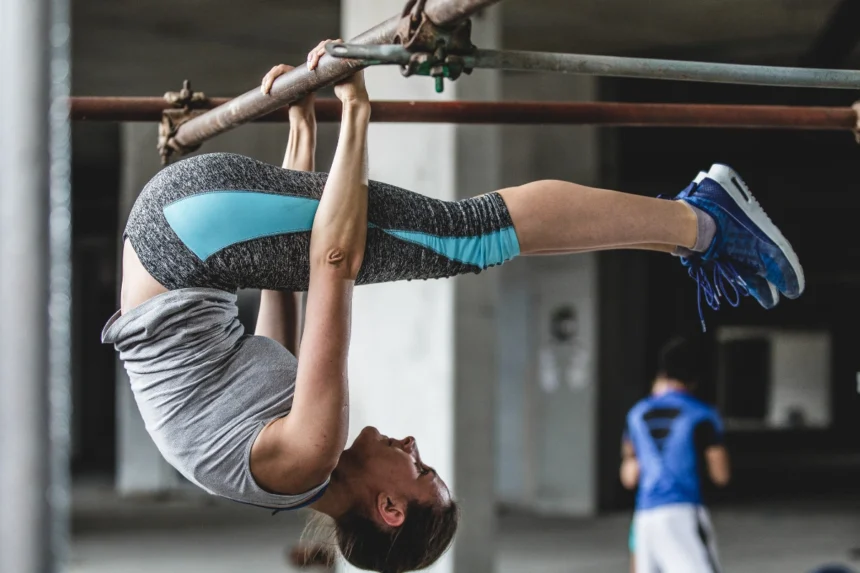
Skin the Cat is a hanging rotation movement performed on a pull-up bar or gymnastic rings. From a hang, you lift your legs, rotate backward, and allow your body to pass through a fully extended shoulder position until your torso points downward behind you.
Over time, this exercise develops:
- Shoulder mobility and strength
- Core control in inverted positions
- Confidence moving through extreme joint ranges
- Preparation for back lever and reverse lever progressions
It’s often considered a foundational movement, and lays the groundwork for advanced skills like the back lever and German hang.
Equipment & Setup
Getting the right setup makes a big difference, especially when learning the skill for the first time.
1. Gymnastic Rings (Preferred Option)
- Setup: Hang the rings from a stable overhead anchor so that, when gripping them with straight arms, your toes lightly touch the floor. This allows for leg assistance during the learning phase.
- Advantages: Rings rotate naturally with your shoulders, reducing joint strain and facilitating smoother movement.
✅ Tip: For home setups, doorway anchors or ceiling-mounted rigs are effective. Ensure the anchor is secure and can support your weight.
2. Pull-Up Bar (Alternative Option)
- Setup: Use a stable overhead bar that allows sufficient clearance for full rotation.
- Considerations: Bars do not offer the same rotational freedom as rings, potentially increasing shoulder strain for beginners.
🔁 Recommendation: When using a bar, limit the range of motion initially to avoid overstressing the shoulders.
3. Grip Tools: Chalk Over Straps
- Use: Apply chalk to improve grip and prevent slipping.
- Avoid: Using wrist straps, gloves, or padded grips, as they can diminish grip strength development.
Step-by-Step Progression: Learning Skin the Cat
Here’s a step-by-step breakdown of each phase of the Skin the Cat—perfect for beginners who want to learn the movement safely.
🔹 Step 1: From Dead Hang to Active Hang
What to Do:
Start by hanging from a bar or rings in a dead hang, arms fully extended, relaxed shoulders.
From here, move into an active hang by engaging your shoulders: pull them down and back slightly without bending your elbows. This stabilizes your upper body.
✅ Tip: If this shoulder activation feels tricky, practice it separately first. There are plenty of tutorials on scapular pulls and active hangs.
🔹 Step 2: Tuck and Rotate
What to Do:
From the active hang, bring your knees up toward your chest and begin to rotate backward. Your goal is to tuck tightly and let your body pivot over the bar or between the rings.
As you rotate, try to keep your feet controlled and your movement smooth. Eventually, you want your back to face downward, arms extended behind you in a “German hang” position.
✅ Tip: If you can’t rotate all the way through yet, that’s okay. Go as far as you can and return to the starting position. These are called partial reps, and they’re a smart way to build strength gradually.
🔹 Step 3: Full German Hang and Return
What to Do:
Once you’ve rotated all the way to the German hang, hold the position briefly. You should feel a strong stretch in the shoulders and upper chest.
To finish the rep, reverse the motion, pull yourself back through the tuck, using your core and lats to control the movement.
✅ Tip: Going back through the motion is often harder than getting into it. If you struggle, try assisted reps using your feet on the floor.
Ring Progressions for Beginners
Rings make the learning curve smoother. Here’s how:
- Hang rings low so your feet touch the ground when hanging.
- Move into an active hang.
- Use your feet to kick into a tucked inversion and support yourself as you rotate into the German hang.
- Use your legs to assist on the way back until you can return without help.
This approach allows you to experience the full motion early, without overloading your shoulders.
Additional progression ideas:
- Start with partial reps (only rotate partway).
- Add isometric holds in key positions (inverted tuck, German hang, active hang).
- Build strength with scapular pulls and straight-arm drills to support the return phase.
Coaching Cues That Make It Click
Small mental reminders can transform your form:
- Stay Long – “Lock your elbows and reach.” Straight arms activate the lats and mimic advanced lever work.
- Hollow, Not Arched – “Tuck your pelvis, ribs down.” Keeps the spine safe and bodyline tight.
- Eyes on the Horizon – Looking forward, not up, protects the neck and aids control.
- Exhale Through the Hardest Point – Breathe out slightly as you drop into the German hang for safer bracing.
Common Roadblocks & Fixes
“I can’t pull back out.”
Place the rings lower. Lightly push off the floor with the toes until you’ve built enough pulling power to finish the rep unaided.
Elbows keep bending.
Add straight-arm scapular raises and ring support holds on off days; they bullet-proof the joint so you can keep the arms locked during the roll-through.
Sharp front-shoulder pinch.
You’ve dropped deeper than your current mobility allows. Reduce range, pair sessions with external-rotation band work, and progress in millimetres, not metres.
Frequently Asked Questions (FAQ)
Bar vs. Rings – Which is Better?
Rings are safer and smoother due to wrist/shoulder rotation. Bars are more stable but harsher on the shoulders. Beginners should start with rings.
Skin the Cat vs. German Hang – What’s the Difference?
- Skin the Cat = full movement (rotation in and out).
- German Hang = stretched end position.
Is it Safe for Beginners?
Yes, if approached gradually. Build shoulder stability first, use rings if possible, and control your descent. Never force range or push through pain.
What if I Feel Shoulder Pain?
Stop immediately. Adjust your range, strengthen supporting muscles, and see a professional if pain persists. Muscle soreness is normal; sharp joint pain is not.
Can I Do This Without Rings?
Yes, with a pull-up bar, but progress slowly. Bars don’t rotate, so they’re less forgiving on joints. Low-bar tuck drills, doorway pull-up hangs, or even floor drills can serve as alternatives. Investing in rings is highly recommended.
