A back walkover is a foundational gymnastics skill where a gymnast begins in a standing position, leans backward into a bridge, and then kicks one leg over to return to standing, landing one foot at a time in a smooth, continuous motion.
It’s commonly seen in floor routines and cheerleading performances and serves as a stepping stone toward more advanced tumbling moves. In this article, we’ll break down the back walkover step by step, so you can progress safely and effectively.
Are You Ready? Prerequisite Checklist
In most recreational gymnastics programs, the back walkover is considered a Level 3 floor skill, which means several milestones should already be in place.
According to ActiveKids.com, gymnasts should be able to perform a bridge kick-over on the floor before attempting a back walkover. But it’s not just about kicking—it’s about kicking with proper form. A strong bridge should show:
- Shoulders stacked directly over (or slightly past) the wrists
- Hips aligned vertically above the knees
If your shoulders collapse behind your hands or your hips sag, your kick-over will likely stall. In that case, it’s best to keep working on shoulder mobility and bridge conditioning first.
You should also be able to do the following:
- ✅ Hold a 15-second handstand against a wall – builds balance and shoulder strength for the inverted phase
- ✅ Lunge out of a forward walkover – shows control in split landings
- ✅ Perform full right and left splits – allows a clean leg split during the skill
Each of these body positions—bridge, handstand, lunge, and split—shows up during the back walkover. If you can’t hit them individually, linking them together will be difficult and potentially unsafe.
💡 Tip: Film yourself attempting the prerequisites. Check shoulder, hip, and leg alignment to assess readiness.
Step-by-Step Technique: Back Walkover on Floor
1. Commit to a textbook lunge.
Start with your dominant foot forward, heel grounded, and toes turned out slightly. The back leg stays locked and extended, forming a straight line from hip to heel. Both knees should track directly over the mid-foot for balance.
Lift your chest and glue your arms to your ears—this tight overhead arm position is essential. Think of lifting your ribcage up and out of the hips. Take a breath, and gently align your front hip over the heel beneath it. That vertical “stack” is what allows you to rock backward without collapsing your core.
💡 Cue: “Strong legs, square hips, arms by ears.”
2. Initiate the lean with your fingertips, not your head.
Picture your fingertips being pulled backward—they should lead the movement, not your head. Your chest opens naturally toward the ceiling as your hips press forward.
Keep your eyes locked on your hands. If your head drops first, your back will hinge (not arc), and you’ll lose control. Aim to keep your heels grounded and knees straight for as long as possible. The more you push the hips forward, the shorter the distance your hands need to travel to the floor.
💡 Cue: “Fingertips first, eyes on thumbs, hips press.”
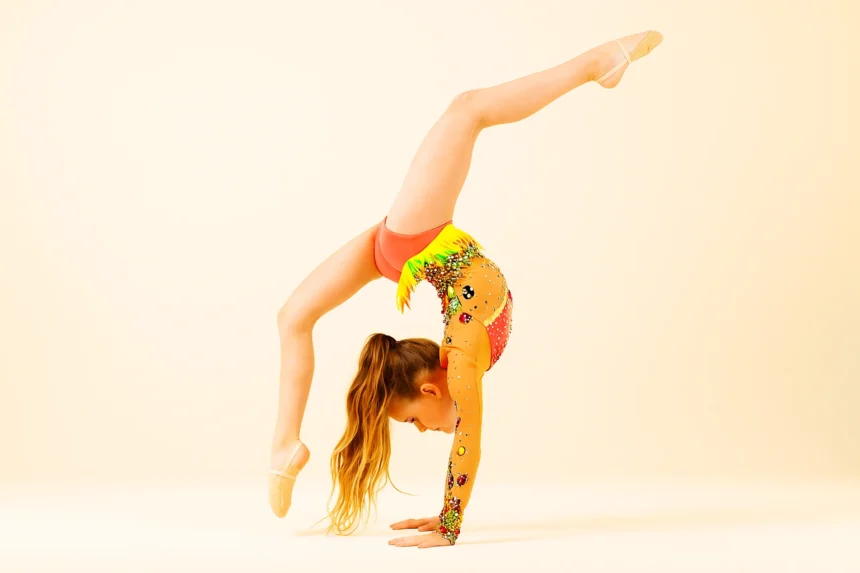
3. Flow through the high bridge checkpoint.
As your hands meet the floor, your body should settle into a strong bridge. Arms are locked straight, palms flat and shoulder-width apart. Now, push tall through the shoulders until they line up directly above—or slightly past—your wrists.
Think of this as the “midpoint” between bridge and handstand. Ribs pull in, glutes stay active, and your eyes are still on your thumbs. If you can’t see the wall behind you between your arms, your shoulders may not be open enough—pause and work on bridge drills to fix this.
💡 Cue: “Hands firm, shoulders forward, arms straight.”
4. Fire the kick leg straight to vertical.
With a stable bridge in place, launch your front leg upward like a perfectly straight lever. The knee must stay locked and toe pointed as the leg lifts past your head. This is where most of your momentum comes from.
As your leg passes vertical, engage your glutes and lift the hips slightly to prevent sinking. At this point, your body begins to resemble a one-legged handstand—tall, tight, and strong.
💡 Cue: “Kick high, knee tight, toe sharp.”
5. Snap the support leg away and hit a full split handstand.
As the lead leg peaks, snap the second leg off the floor. Think of “clapping” your thighs apart to create a clean 180° split. Both knees remain straight, and toes stay pointed.
In this brief handstand moment, your body is perfectly balanced: shoulders pushing tall, core active, and legs split in opposite directions. This position is not just beautiful—it’s required for full credit in many competitive programs.
💡 Cue: “Snap wide, split strong, balance tall.”
6. Control the down-phase: lever, don’t drop.
Let the first leg continue its arc downward like a slow-moving pendulum. Lower it deliberately—like a drawbridge—keeping the knee straight and the shoulders pushing tall.
Avoid rushing. This lever-out phase allows you to align your chest vertically above your foot, preventing a “crunched” landing where your chest meets your thigh.
💡 Cue: “Ride the arc, stay tall, don’t rush the drop.”
7. Finish in the same lunge you started.
Your front foot touches down softly, with a slight knee bend to absorb impact. The second leg follows into a clean lunge behind it.
Keep your chest lifted and arms glued to your ears until your balance is fully settled. Only after holding the finish for a second should you move into any required pose or presentation.
A calm, upright landing demonstrates control and prevents execution deductions.
💡 Cue: “Step down proud, hold the pose.”
🧩 Practice Tip:
Break the walkover into chunks before attempting it as a full skill:
- Steps 3–4: Practice bridge kick-overs to build power and confidence.
- Step 5: Hold split handstands against a wall for alignment and leg control.
- Step 6: Try lever-down drills from handstand for balance and finish control.
When each piece feels automatic, the back walkover flows like a cartwheel in slow motion—graceful, strong, and seamless.
Safety Tips for Beginners
The back walkover looks elegant—but it takes practice and supervision to perform safely. USA Gymnastics recommends the following:
- ✅ Use a soft mat or padded surface
- ✅ Apply chalk to hands for grip
- ❌ Never practice on concrete, grass, or hardwood
- ❌ Don’t force through a tight bridge—work on flexibility first
A qualified coach or spotter should support the lower back and hamstrings during early attempts. Don’t skip this step—it’s your safety net.
💡 Tip for parents and coaches: Continue supervising even after the gymnast learns the skill, especially when transitioning to new surfaces or combining skills into routines.
Troubleshooting Common Errors
Here’s how to spot and fix common beginner mistakes:
| Problem | Cause | Fix | Cue |
|---|---|---|---|
| Bent kick leg / small split | Tight hamstrings or poor engagement | Stretch splits daily, practice leg lifts | “Lock the knee, point the toe, push for 180°” |
| Arms leave ears mid-skill | Weak shoulder position | Drill wall walk-downs, start from a block | “Arms never leave the ears” |
| Landing with feet too close | Rushed finish, poor control | Practice slow lever-outs | “Finish high, step late” |
| Fear of going backward | Lack of confidence | Try couch-to-floor drills, spot frequently | “Small steps. Soft landings.” |
Final Note
Learning the back walkover is a journey. Some gymnasts get it quickly, others take time—and that’s okay. The key is to master the shapes, stay consistent with drills, and listen to your body. With steady progress and attention to form, you’ll build the strength, flexibility, and confidence to flip back with grace.