The chest-to-bar pull-up is one of the most powerful and challenging exercises in strength training, and many fitness enthusiasts aim to achieve it. While it may seem daunting at first, with consistent practice and the right progression, anyone can master it.
Below is a step-by-step guide to help you master the chest-to-bar pull-up, starting from the basics and gradually building up your strength and technique.
Step 1: Chest Pulls
Before even thinking about performing a full pull-up, it’s essential to understand the basic movement pattern. Chest pulls are an excellent way to test your range of motion and practice proper form.
Start by lying on your stomach on the floor or on a bench. You can use a broomstick, towel, resistance band, or even a cable pull-down setup to simulate the pull-up motion. The goal is to drive your elbows back and behind you, keeping them close to your body. As you pull, focus on depressing your scapula (shoulder blades) and engaging your upper back muscles. Imagine you’re trying to pull your chest towards a bar, but you’re not quite there yet.
This exercise will help you understand the motion of pulling your chest towards the bar, a crucial part of the pull-up. Perform 15 reps for 3 sets, and focus on slow, controlled movements. Once you’re comfortable with the form, move on to the next step.
Step 2: Scapula Adductions
The scapula adductions exercise is all about building a strong neuromuscular connection between your back and shoulders. When you perform a pull-up, you need to be able to engage your scapula, or shoulder blades, properly.
You can do this exercise using a pull-up bar or rings. If you don’t have either, a simple push-up position on the floor will work too. Focus on drawing your shoulder blades together while keeping your elbows extended. This movement is essential because it activates the muscles necessary for the full range of motion during a pull-up.
Perform 15 reps for 3 sets, and hold the top position for 30 seconds to really engage the muscles. Once this feels easy, you’re ready to move to the next progression.
Step 3: Scapula Depressions in Hanging
In this step, you’re going to practice hanging and performing scapula depressions. Hang from a pull-up bar with your arms fully extended, then focus on depressing your scapula down and towards your spine. This action will help you learn how to control your body and engage the proper muscles during the upward phase of the pull-up.
Make sure your elbows stay extended throughout the movement. Focus on pushing down through your shoulder blades, not your arms. Aim for 15 reps with a 30-second hold at the top of the movement. This will help you build the necessary strength to control your body weight and prepare you for the actual pulling motion.
Step 4: Scapula Push-Ups
Now that you’ve mastered scapula adductions and depressions, it’s time to combine them into scapula push-ups. This exercise is similar to a regular push-up, but instead of focusing on bending your elbows, you’ll concentrate on moving your scapula.
In a push-up position, press your shoulder blades down and then push them apart while keeping your arms straight. Think of this as a push-up for your shoulder blades. This movement reinforces the proper shoulder engagement you’ll need for a pull-up. Perform 10 reps for 3 sets, focusing on control and form. You can use your legs for assistance if needed, but be sure to focus on scapula movement above all else.
Step 5: 45° Inverted Rows
Inverted rows are a great way to start strengthening the pulling motion. Set yourself up at a 45° angle under a bar or rings, and start with a passive hang. From here, bend your elbows to pull your chest up towards the bar. As you pull, focus on keeping your shoulder blades depressed and retracted, just like you did in the previous steps.
This exercise mimics the motion of a pull-up while allowing you to work at a lower intensity. Aim for 15 reps for 3 sets, focusing on the full range of motion and keeping your back engaged.
Step 6: Inverted Rows with Bent Knees
To make the inverted rows slightly easier while still building strength, bend your knees and reduce your body angle. This will decrease the difficulty of the exercise but still help you practice the pulling motion. Keep your arms close to your body as you pull yourself up, and ensure your shoulder blades are doing most of the work.
Perform 15 reps for 3 sets. As you get stronger, you can reduce the angle further to increase the challenge.
Step 7: Inverted Rows with Straight Body
Now, it’s time to increase the difficulty of your inverted rows by keeping your body straight while pulling. This progression moves harder, as you’re working with your full body length. Keep your shoulder blades engaged throughout the motion, and aim to touch your chest to the bar at the top of the movement.
This step is important for building the strength you need for a full pull-up. Perform 15 reps for 3 sets, ensuring your form remains strict.
Step 8: Elevated Leg Inverted Rows
The final step in the inverted row progression is to elevate your legs. By placing your feet on a raised platform, you’ll simulate the angle of a real pull-up. This progression is crucial because it closely mimics the mechanics of the chest-to-bar pull-up, allowing you to practice the motion with proper technique.
Perform 15 reps for 3 sets, ensuring that each rep is strict and that you touch your chest to the bar at the peak of the movement. Once you can perform these efficiently, you’re very close to being able to do a pull-up.
Step 9: Leg Assisted Pull-Ups
In this step, you’ll begin practicing actual pull-ups with leg assistance. Use a lower bar to provide yourself with more support from your legs. This will allow you to practice the pull-up motion while your legs help you reach the chest-to-bar position.
The goal is to practice the correct form and get used to the feeling of pulling yourself up. Perform 15 reps for 3 sets, ensuring that your scapula is fully engaged and your chest is reaching the bar.
Step 10: Holding the Upper End Point and Doing Negatives
The upper-end hold is an excellent way to build endurance for the pull-up. To do this, pull yourself up until your chest is touching the bar and hold that position for as long as you can. Once you’re fatigued, descend slowly and with control, aiming for a 5-second descent.
This exercise builds both strength and control, as you need to hold your body up and then lower yourself slowly. Perform 3 sets of 6 reps, focusing on a slow, controlled descent to improve your strength in the negative portion of the pull-up.
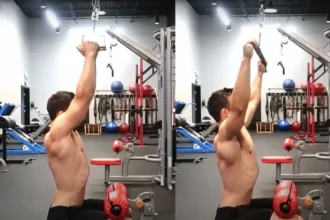
Step 11: Pull-Ups with an Elastic Band
Elastic bands assist while allowing you to perform real pull-ups. Choose a band with the appropriate resistance level and place one or both feet in the band. This allows you to practice the full pull-up motion, with the band helping you as needed.
Focus on engaging your scapula, pulling your elbows back, and ensuring that your chest reaches the bar. Perform 15 reps for 3 sets, gradually reducing the band resistance as you get stronger.
Step 12: The Pull-Up
At last, you’re ready for the chest-to-bar pull-up! If you’ve followed all the previous steps and built up your strength and technique, you should be able to perform a perfect pull-up. Engage your scapula, pull your elbows back, and focus on bringing your chest to the bar.
Once you’ve achieved your first pull-up, keep practicing to increase your repetitions and refine your form. With consistent effort, you’ll be able to master the chest-to-bar pull-up and continue improving your strength.
Conclusion
Getting to your first chest-to-bar pull-up might feel like a long journey, but it’s incredibly rewarding once you nail it. Stay consistent, keep practicing, and soon enough, you’ll be able to perform a perfect chest-to-bar pull-up with ease!