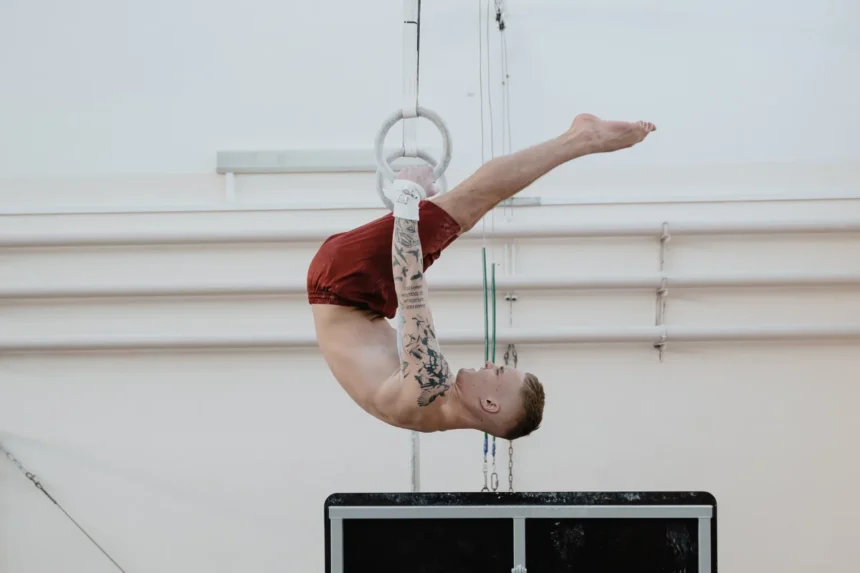
The front lever is one of the most iconic static holds in calisthenics and gymnastics. Performed on rings, it’s even more impressive: a straight, rigid body held parallel to the ground, suspended by only your straight arms. It’s a true test of core control, scapular strength, and patience.
Key Principles Before You Begin
Before starting front lever progressions, lock in these fundamentals. They apply to every step—tuck, straddle, or full—and will decide how fast and safely you improve.
- Straight Arms → Keep elbows locked. Even a slight bend shifts work away from your lats and overloads your arms.
- Shoulder Depression → Push shoulders down from your ears. This protects joints and gives you a solid base.
- Pulling Action → Think about pulling your hands down toward your hips, like a straight-arm lat pulldown.
- Neck & Head → Keep your head neutral, relaxed, and in line with your body—not craned or forced.
- Body Line → Aim for a flat, hollow shape: ribs down, glutes tight, legs straight and together. Avoid arching your back.
| Principle | ✅ Do | ❌ Don’t |
|---|---|---|
| Straight Arms | Lock elbows fully, keep arms rigid | Bend elbows, even slightly—shifts load and stresses joints |
| Shoulder Depression | Actively press shoulders down and back, away from ears | Shrug or let shoulders ride up toward ears |
| Pulling Action | Think “arms to hips,” lats and core engaged | Rely on arms only, pulling with biceps |
| Neck & Head Position | Keep head neutral, relaxed, like on a pillow | Crane neck forward or jam chin to chest |
| Body Line | Hollow body: ribs down, glutes tight, legs straight and together | Arch lower back, separate legs, or let core sag |
The Minimal, High-Yield Progression Ladder
The front lever doesn’t require dozens of drills—just a handful of progressions practiced consistently with excellent form. Each step follows the same pattern:
Slow negative → pause 3–5 seconds at midline → continue lowering.
This approach teaches control where torque is highest and builds the strength needed to eventually hold the full lever. Advance only when you can perform 5–8 clean singles per session without breaking form.
1) Pulling Prep (Scapular Depression Pulls)
How to do it
- Hang from the rings (or a bar) with arms completely straight in a dead hang.
- Without bending your elbows, pull your shoulders down and slightly back—as if sliding your shoulder blades into your back pockets.
- Drive your hands toward your hips while lightly lifting your chest. Keep legs relaxed and hanging beneath you.
Prescription
- Hold for 3–5 seconds per rep.
- Perform 6–10 reps in a set.
- Focus on control, not speed.
Key cues
- “Elbows locked.”
- “Shoulders away from ears.”
- “Hands pressing down into the rings.”
This builds the base of the front lever. It teaches you to keep arms straight, engage your lats, and control your shoulders. Without this, every harder step will fall apart.
Tempo tip: 1–2 s set-up into depression → 3–5 s hold → smooth release.
Success criteria: No elbow bend, no shoulder shrug, rings stay quiet.
2) Knee-Raise to Inverted Hang (Arms Straight)
How to do it
- Begin in a dead hang with arms fully straight.
- Perform a pulling prep by sliding shoulders down and slightly back—elbows remain locked.
- Lift knees toward your chest, rolling hips upward until your body inverts.
- Finish in a controlled inverted hang, arms straight and shoulders engaged.
Prescription
- 3–5 controlled reps per set.
- Pause briefly at inverted before lowering.
- Use 2–3 sets as prep work or warm-up before lever holds.
Key cues
- “Lock elbows, no bend.”
- “Pull shoulders down before lifting knees.”
- “Lift with core, not arms.”
- “Keep rings still—avoid swinging.”
Links shoulder strength with core control. It also helps you get comfortable upside down, which is key for clean lever entries.
Tempo tip: 2 s pull-down set-up → 2–3 s knee raise → 1–2 s stabilize inverted.
Success criteria: No momentum, no elbow bend, stable rings at the top.
3) Tight Tuck Front Lever
How to do it
- Start in a controlled inverted hang with arms locked and shoulders depressed.
- Tuck knees tightly into your chest—think “knees to ribs.” Keep a light hollow spine.
- Slowly lower hips until your back reaches horizontal.
- Pause at midline for 3–5 seconds, then continue lowering into a dead hang with control.
Prescription
- 5–8 singles with clean midline pauses.
- Rest 60–90 s between attempts.
- Aim for 2–3 sets per session.
Key cues
- “Elbows locked.”
- “Pull arms toward hips.”
- “Sit back, don’t curl forward.”
- “Knees glued to chest.”
The tuck shortens the body, making the lever easier to manage. It lets you practice the real lever shape with less load, while locking in good shoulder and core habits.
Tempo tip: 3–4 s lower → 3–5 s pause → 1–2 s finish.
Success criteria: Flat back at midline, quiet rings, no elbow bend or shoulder shrug.
4) Open Tuck Front Lever
How to do it
- Begin in a stable inverted hang with arms straight and shoulders depressed.
- Lower into the front lever, but instead of keeping knees glued to chest, extend them slightly away from the torso.
- Maintain a rounded hollow body and locked elbows as you reach horizontal.
- Pause 3–5 s at midline, then lower to a dead hang under control.
Prescription
- 5–8 singles with midline pauses.
- Use 2–3 sets depending on fatigue.
- As you tire, regress to tight tuck to maintain quality.
Key cues
- “Elbows locked, shoulders down.”
- “Arms pull toward hips.”
- “Knees drift away, but stay together.”
- “Hollow body—don’t arch.”
By opening your knees, you add more difficulty without changing the form. It’s a smooth way to increase load while keeping technique solid.
Tempo tip: 3–4 s lower → 3–5 s pause → 1–2 s finish.
Success criteria: No rib flare, no elbow bend, consistent hip height.
5) Can-Opener (One Leg Extended)
How to do it
- Start in a controlled inverted hang with arms fully straight and shoulders depressed.
- Tuck one leg close to your chest while extending the other leg fully straight.
- Lower slowly into the lever, keeping arms locked and shoulders engaged.
- Pause 3–5 s at midline, then lower to dead hang.
- Switch legs each set to build evenly.
Prescription
- 3–6 singles per leg.
- 2–3 sets per session.
- Adjust difficulty by pulling the tucked leg closer (easier) or opening it slightly (harder).
Key cues
- “One leg tight, one leg long.”
- “Keep hips square—don’t twist.”
- “Arms pull toward hips, elbows locked.”
- “Shoulders down and stable.”
Extending one leg makes the lever harder, while the tucked leg makes it manageable. You can adjust how hard it feels by moving the tucked leg closer or farther.
Tempo tip: 3–4 s lower → 3–5 s pause → 1–2 s finish.
Success criteria: Hips level, no rotation, smooth leg switch set to set.
6) Straddle Front Lever
How to do it
- Begin in an inverted hang with arms straight, shoulders down, and body tight.
- Spread legs wide into a straddle.
- Lower into the lever slowly, elbows locked, body line flat.
- Pause 3–5 s at midline, then continue to dead hang with control.
- As you get stronger, gradually narrow the straddle until your legs are nearly together.
Prescription
- 4–6 singles with clean midline pauses.
- Rest 60–90 s between attempts.
- Train 2–3 sets per session depending on recovery.
Key cues
- “Wider straddle = easier, narrower = harder.”
- “Arms locked, shoulders down and back.”
- “Keep hips level—don’t let one side sag.”
- “Hollow body: ribs down, glutes tight, no arching.”
The wide legs reduce leverage, making it easier than the full lever but closer than the tuck. Bringing the legs in over time builds straight-leg strength step by step.
Tempo tip: 3–4 s lower → 3–5 s pause → 1–2 s finish.
Success criteria: Even leg width, level hips, steady rings.
7) Full Front Lever (Negatives + Holds)
How to do it
- Begin in a solid inverted hang with arms locked and shoulders depressed.
- With legs straight and together, slowly lower into the horizontal lever.
- Pause 3–5 s at midline, then continue to dead hang.
- As you improve, add short static holds at midline before lowering.
- Expect a slight pike at first—flatten hips gradually without allowing lumbar arch.
Prescription
- 3–6 controlled negatives with pauses.
- Train 2–3 sets per session.
- Once you can pause consistently, build short statics (2–5 s) over time.
Key cues
- “Legs glued together, knees locked.”
- “Arms straight, shoulders down.”
- “Pull hands toward hips—don’t arch the back.”
- “Neck neutral—resting on a pillow.”
This is the end goal. Negatives and short holds build the strength and control you need for long statics. Practicing this patiently makes your lever solid and repeatable.
Tempo tip: 4–5 s lower → 3–5 s pause → 1–2 s finish.
Success criteria: No rib flare, no elbow bend, flat hips (minimal pike), quiet rings.
Training Strategy
- Start each workout at your highest clean step (e.g., straddle).
- Do 3–5 quality singles with midline pauses.
- Work back down through easier steps (open tuck → tuck).
- Log volume, focus on form, and expect day-to-day ups and downs.
FAQ
Straddle or Can-Opener first?
Both work. Straddle gives symmetrical balance, while can-opener lets you fine-tune difficulty. Pick whichever you can pause cleanly at midline.
Why so much focus on negatives?
Because negatives force you to control the hardest part of the lever—the descent under maximum torque. They scale perfectly across tuck, straddle, and full.
How do I know when to move up?
Advance when you can do 5–8 singles with a 3–5 s midline pause. Use that as your highest step, then ladder down.
How often should I train?
2–3 times per week. Straight-arm work stresses tendons, so allow at least 48 hours between sessions. Use off days for light core and shoulder prehab.