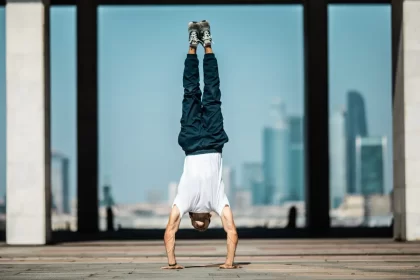
Holding a handstand for an extended period can be challenging but extremely rewarding. In this guide, We’ll share some tips and tricks to help you balance and maintain your handstand longer.
Contents
1. Start with a Proper Lunge
To do a handstand right, first, get into a basic lunge: one foot ahead, knee bent, and the other leg straight behind you. This helps you stay steady as you move to the next step.
Next, move into what’s called the “T position.” This means your body should line up with your arms out in front and your back leg up, making a straight line from your hands to your foot, like a ‘T’. This position helps you find balance and get ready to lift into a handstand.
Before you begin, figure out which side feels more natural for you. If you’re right-handed or find it easier to do splits with your right leg, your left leg will go up during the handstand. If you’re left-handed or prefer left-leg splits, it’s your right leg that will be in the air. It’s all about what feels best for you.
2. Kick Lightly
Start practicing by gently kicking off the ground with your back leg. The trick is to kick lightly—just enough to get both feet off the ground without losing control.
This helps you get the hang of the movement and the momentum you need for a full handstand. As you get more comfortable, you can kick harder until you’re ready to hold the handstand position.
If you’re just starting out, it’s a good idea to practice on a soft surface like your bed to make sure you land safely. Once you’re more comfortable, try practicing against a wall.
Putting a pillow under your head during your first tries can make you feel more secure, which can boost your confidence as you kick up, knowing there’s something soft beneath you.
3. Learn to Fall Safely
Mastering handstands involves not just balancing but also learning how to fall safely. Falling is inevitable in the journey of mastering handstands, but understanding the proper techniques can make it less intimidating and reduce the risk of injury.
Embracing the Bridge Technique
When you feel yourself losing balance during a handstand, transitioning into a bridge position can be a lifesaver. Arch your back gracefully, plant your hands firmly on the ground, and allow your body to form a gentle curve. This technique helps to redirect the force of the fall, minimizing the impact on your body.
Overcoming Fear of Falling
Fear of falling is natural, but it shouldn’t hold you back. Recognize that falling is part of the learning process. Each fall is an opportunity to refine your technique and build resilience.
4. Focus on Form
Perfecting your handstand form is about more than just lifting your legs off the ground. It’s about maintaining balance and stability throughout the entire movement. Here’s how to ensure your handstand form is on point:
1. Align Your Arms and Shoulders: Keep your arms shoulder-width apart, and ensure your shoulders are positioned away from your ears, even in the starting lunge position. This alignment provides a stable foundation for balance as you kick up into the handstand.
2. Engage Your Core: Activate your core muscles to keep your spine straight and prevent sagging. Focus on keeping your abdominal muscles engaged throughout the entire handstand to support your body’s alignment.
3. Tuck Your Butt: Don’t forget about your hips! Tucking your butt in not only looks better but also helps maintain alignment from head to toe, improving balance and stability.
4. Push Through Your Shoulders: Actively push up and through your shoulders to stabilize your body and prevent collapsing. Keep reaching for the sky with your shoulders to maintain a strong and extended position throughout the handstand.
5. Focus on Upper Body Strength: Work on strengthening your shoulders, arms, and upper back to improve your ability to push through your shoulders during a handstand.
6. Pay Attention to Details: Small adjustments like squeezing your thighs together and pointing your toes can greatly improve stability and aesthetics. These details contribute to a polished handstand.
7. Reference Diagram for Form: For visual learners, a diagram can be a helpful reference guide. Feel free to use the provided diagram to check your form during practice sessions.
5. Balance Tips
Achieving balance in a handstand requires a combination of proper form and strong upper body muscles. Without these, even a slight imbalance can lead to a fall. Here’s how you can optimize your handstand form for improved stability:
- Utilize the Wall for Form Practice
The wall is an excellent tool for refining your handstand form. Practice kick-ups against it to ensure proper alignment and positioning. Focus on keeping your arms straight and shoulders aligned with your ears. This helps build muscle memory and reinforces the correct form essential for balancing without support.
- Build Upper Body Strength
Building strength in your arms, shoulders, and core is really important for mastering handstand balance. Include exercises such as planks, push-ups, and shoulder presses in your workouts to strengthen these areas. This will help you stay stable and maintain proper alignment when you’re upside down in a handstand.
- Separate Your Fingers
Pay attention to how you place your fingers during handstands. Slightly separate your fingers to create a solid grip on the ground, improving stability. Think of your hands as a teeter-totter—if you start tipping forward, curl your fingers to push back into alignment, and vice versa. Practicing this adjustment on all fours can help you understand how to use your fingers for balance.
- Practice Centering Techniques
Learning to center yourself when off-balance is crucial for stability. If you tilt forward, gently pull yourself back to the center using your fingers. If you’re falling backward, shift your weight forward to regain control. Regular practice of these techniques improves your ability to correct imbalances and maintain stability.
- Strengthen with Targeted Exercises
Incorporate exercises targeting the abs and arms to enhance handstand practice. Strengthening these areas not only helps you hold a handstand but also improves overall stability and control.
6. Breathe Correctly
When practicing handstands, it’s easy to overlook how important breathing is. However, mastering the right way to breathe can really boost your performance and keep you steady.
Breathing During Handstand Preparation
Getting ready for your handstand starts with your breathing. As you set up your starting position, take a deep breath in. This deep breath helps get your muscles ready for the work they’re about to do and calms your mind before you lift off.
Exhaling as You Enter the Handstand
As you transition from getting ready to actually doing the handstand, make sure to exhale. Breathing through your nose is better than breathing through your mouth. It keeps you calmer and more focused. Plus, it helps you control your breath better so you don’t get dizzy or thrown off while you’re upside down.
The Benefits of Controlled Breathing
Controlled breathing doesn’t just help keep your handstand stable, it also improves your overall performance:
- Improves muscle control and balance: Regular breathing helps keep your body tensions in check, making your handstand more stable.
- Lowers anxiety and boosts focus: Taking deep, controlled breaths calms your nerves and helps you concentrate better during your practice.
- Boosts endurance and performance: Good breathing techniques mean your muscles get the oxygen they need, so you can hold your handstand longer and more comfortably.
7. Try Different Variations
The double stag handstand, where both legs are bent and knees point in opposite directions, is often easier to balance than a regular handstand. This is because the weight of your legs is more evenly distributed, creating a stable base. Once you’ve got the hang of a basic handstand, trying the double stag is a great next step.
Another fun variation to try is the split handstand. It not only challenges your balance but also makes for a striking photo! To really see improvements in your handstand form, consider filming yourself. This can give you a new perspective on what you need to work on.
When performing your handstand, think about reaching up to the sky. Push through your shoulders and tighten every muscle in your body as if you’re pushing off the ground, striving to reach higher.
Finding your center is key; you’ll know you’ve found it when you can hold your balance for a longer time. It feels like your spine curves perfectly and your hips align just over your head—it’s a bit tricky to describe but you’ll recognize it once you experience it.
In conclusion, handstands require perseverance and confidence. Keep practicing regularly, and you’ll see your skills and balance improve.