Today, we’ll share a core routine from the coach Summar to help you take a step toward your handstand, calisthenics, or core-based goals in a short amount of time. This workout can be done daily, even without a warm-up.
The Workout Blueprint:
This routine comprises a sequence of body positions, akin to mini calisthenics sessions. The beauty lies in its simplicity—it can be seamlessly integrated into your daily schedule. Whether it’s during a lunch break, pre or post-workout, this routine fits snugly into any pocket of your day.
Here are some key points to focus on during the workout:
- Focus on aligning your arms properly
- Externally rotating your shoulders
- Creating space in your chest
- Engaging your core
All you’ll need for this workout is a yoga mat and a can-do attitude. The main goal of this workout is to hold each position solidly for one minute, minimizing movement throughout. For those needing a modified version, take a break from 25 to 35 seconds.
So let’s get started!
1. Plank Position
This foundational exercise is key to building a strong core and improving overall stability. Engage your core, externally rotate your shoulders, and push the ground away. Hold for one minute, focusing on stability and alignment.
Activating Your Core
Before you start the plank, tighten your tummy muscles. Imagine pulling your belly button towards your spine to make your abs firm. This important step helps you keep a good posture and get the best results.
Hand Placement and Grip
As you get ready for the plank, think about where you put your hands. Your hands are like the base of a sturdy building – they should be placed firmly on the ground, with your fingertips pressing into the mat. This technique not only helps you stay steady but also works your forearm and shoulder muscles, getting you ready to do well.
Getting into the Plank
Now, lift your body off the floor and into the plank position. While you do this, focus on turning your shoulders outward. This protects your shoulder joints and works the muscles in your upper back and chest, making you stronger and more stable.
Core Activation
While you’re holding the plank, remember to tighten your pelvic floor muscles. This small adjustment helps keep your pelvis stable and protects your lower back. By tilting your pelvis and engaging your pelvic floor, you set up a strong base to do the exercise safely and effectively.
2. Side Star
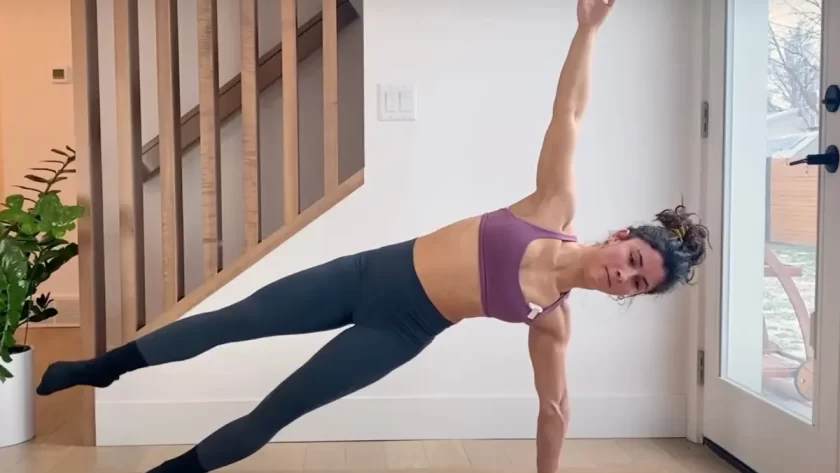
This is a fantastic move for building core strength and shoulder stability. Rotate your shoulders, engage your core, and lift your hips. Hold for one minute on each side.
Having a mirror nearby is incredibly helpful to ensure you’re maintaining perfect form throughout.
Getting into Position
Begin by lying on your side, and then prop yourself up on one elbow. Your feet should be stacked on top of each other. Grip the ground with your handstand fingers to create a stable base. This action not only helps with balance but also activates your shoulder muscles.
Rotating the Shoulder
As you lift into the side star, focus on rotating your shoulder outward. This external rotation is crucial for protecting your shoulder joint and engaging the upper back muscles. Push the ground away from you, creating space between your shoulder and ear.
Core Engagement
Squeeze your tummy muscles tight as you lift. Imagine pulling your belly button towards your spine, like you do in a plank. This helps keep your whole body steady and makes the exercise more effective. Keep pushing the ground away and try to pull your shoulder blades apart while reaching towards the ceiling with your free hand.
Lifting the Hips
Keep your hips up and in line with your body. Pushing the ground away helps lift your hips higher and works your core even more. If you can, make it a bit tougher by lifting your top leg, which works more muscles.
Final Push
As you approach the last 10 seconds, lift your top foot off the ground if you can. This move tests your balance and strengthens your core and hip muscles. Keep pushing through your shoulder and lifting your hips as high as possible. And when the time is up, slowly lower yourself down with control.
3. Elbow Plank
Let’s transition into the elbow plank – a classic move that targets your core muscles while also engaging your upper body and improving overall stability. Hold for one minute, maintaining alignment and stability.
Setting Up
As you get ready for the elbow plank, start by opening your chest and rotating your shoulders. This not only sets up your body properly but also prepares your upper body for the exercise. Once in position, press your fingers into the ground and tighten your core. Make sure your back is flat and your chest is pulled forward for the right alignment.
Engaging Your Core
As you hold the elbow plank, keep your core engaged at all times. Imagine drawing your belly button towards your spine to create a strong, stable center. Check your form in a mirror if possible, ensuring your shoulders are directly above your elbows and your body forms a straight line from head to heels.
Pushing Through
Push down into the ground with your elbows, shoulders, and hands. This action not only stabilizes your upper body but also activates the muscles in your chest, shoulders, and arms. Keep pushing away from the ground, squaring your hips, and lengthening through your spine.
Adding Some Push-Ups
As we approach the last few seconds, let’s challenge ourselves with a few push-ups. Focus on maintaining proper form and control as you lower yourself down and push back up. Feel the burn in your core and upper body – that’s your muscles working hard to support you.
Completing the Set
And there you have it – you’ve completed the elbow plank with push-ups. Take a moment to catch your breath and congratulate yourself on a job well done.
4. Stomach Lift
Let’s break down the steps for the stomach lift exercise to ensure you’re getting the most out of your workout.
Positioning and Alignment
Start by lying on your stomach with your feet together. Lift your feet off the ground while keeping your elbows positioned directly beside your shoulders. It’s crucial to maintain proper alignment here—your elbows should be neither too far back nor too far forward but directly in line with your shoulders.
Engaging the Movement
As you lift your feet, imagine pulling your arms up, engaging your glutes, and lifting your chest off the ground. Rotate your shoulders to open them up further, focusing on form and maximizing your range of motion.
Pushing Through Challenges
Push yourself to lift higher and rotate your shoulders more. Focus on making tight fists and maintaining intensity throughout the exercise. Remember, you’ve got this—keep pushing through!
Maintaining Core Stability
Pay close attention to your core engagement. Pull your stomach in to avoid bulging and create a flat, streamlined profile. If needed, bring your knees in closer or adjust your hand placement to ensure there are no gaps, maintaining a smooth line along your stomach.
Making Adjustments as Needed
If you find the exercise challenging, don’t hesitate to take a regression. Ensure your lower back stays in contact with the ground throughout the movement. You’re almost there—stay focused and keep pushing through for those final seconds.
5. Glute Bridge
The glute bridge is a great workout for focusing on your glutes and hamstrings. To make the most of it, it’s important to pay attention to the details. Here’s how to do it:
Setup and Initial Position
Begin by sitting on the floor with your knees bent and feet flat. Position your feet so that they’re hip-width apart, ensuring a stable base. Press your heels into the ground to anchor your feet securely.
Engage and Lift
Press your big toe and the rest of your toes into the floor, enhancing your stability. Start the movement by lifting your hips towards the ceiling. Focus on a gentle pelvic rotation, tucking your buttocks under as you lift. It’s crucial to engage your core to keep your midsection stable and flat, protecting your lower back.
Increase Stability and Rotation
Place your palms flat beside your hips on the ground. This not only stabilizes your upper body but also supports a greater rotation through your hips. Ensure that the rotation comes from your hips and not your lower back. This focus helps maintain a neutral spine and prevents undue stress.
Maximize the Lift
As you reach the top of your lift, challenge yourself to push a little higher. Encourage more hip rotation and intensity in your movement. Your feet should stay anchored firmly, driving the motion and intensity through your hips and glutes.
Focus on Muscle Engagement
If you’re struggling to feel the burn in your hamstrings, try visualizing pulling your heels towards your glutes. This mental focus can help increase muscle activation. Push through the exercise, encouraging yourself to squeeze tighter and lift higher. Keep your energy high and maintain your form to make the most out of every repetition.
Conclusion
This workout’s versatility makes it ideal for any schedule. You can do this routine multiple times a day, once a day, before your main workout, or even after it. Mix it up to keep things interesting and to fit your specific training needs. It’s a great way to enhance your strength, stability, and overall fitness.
